Tutorial How To
Adding an Outline
White on white editing in free online editor Photopea
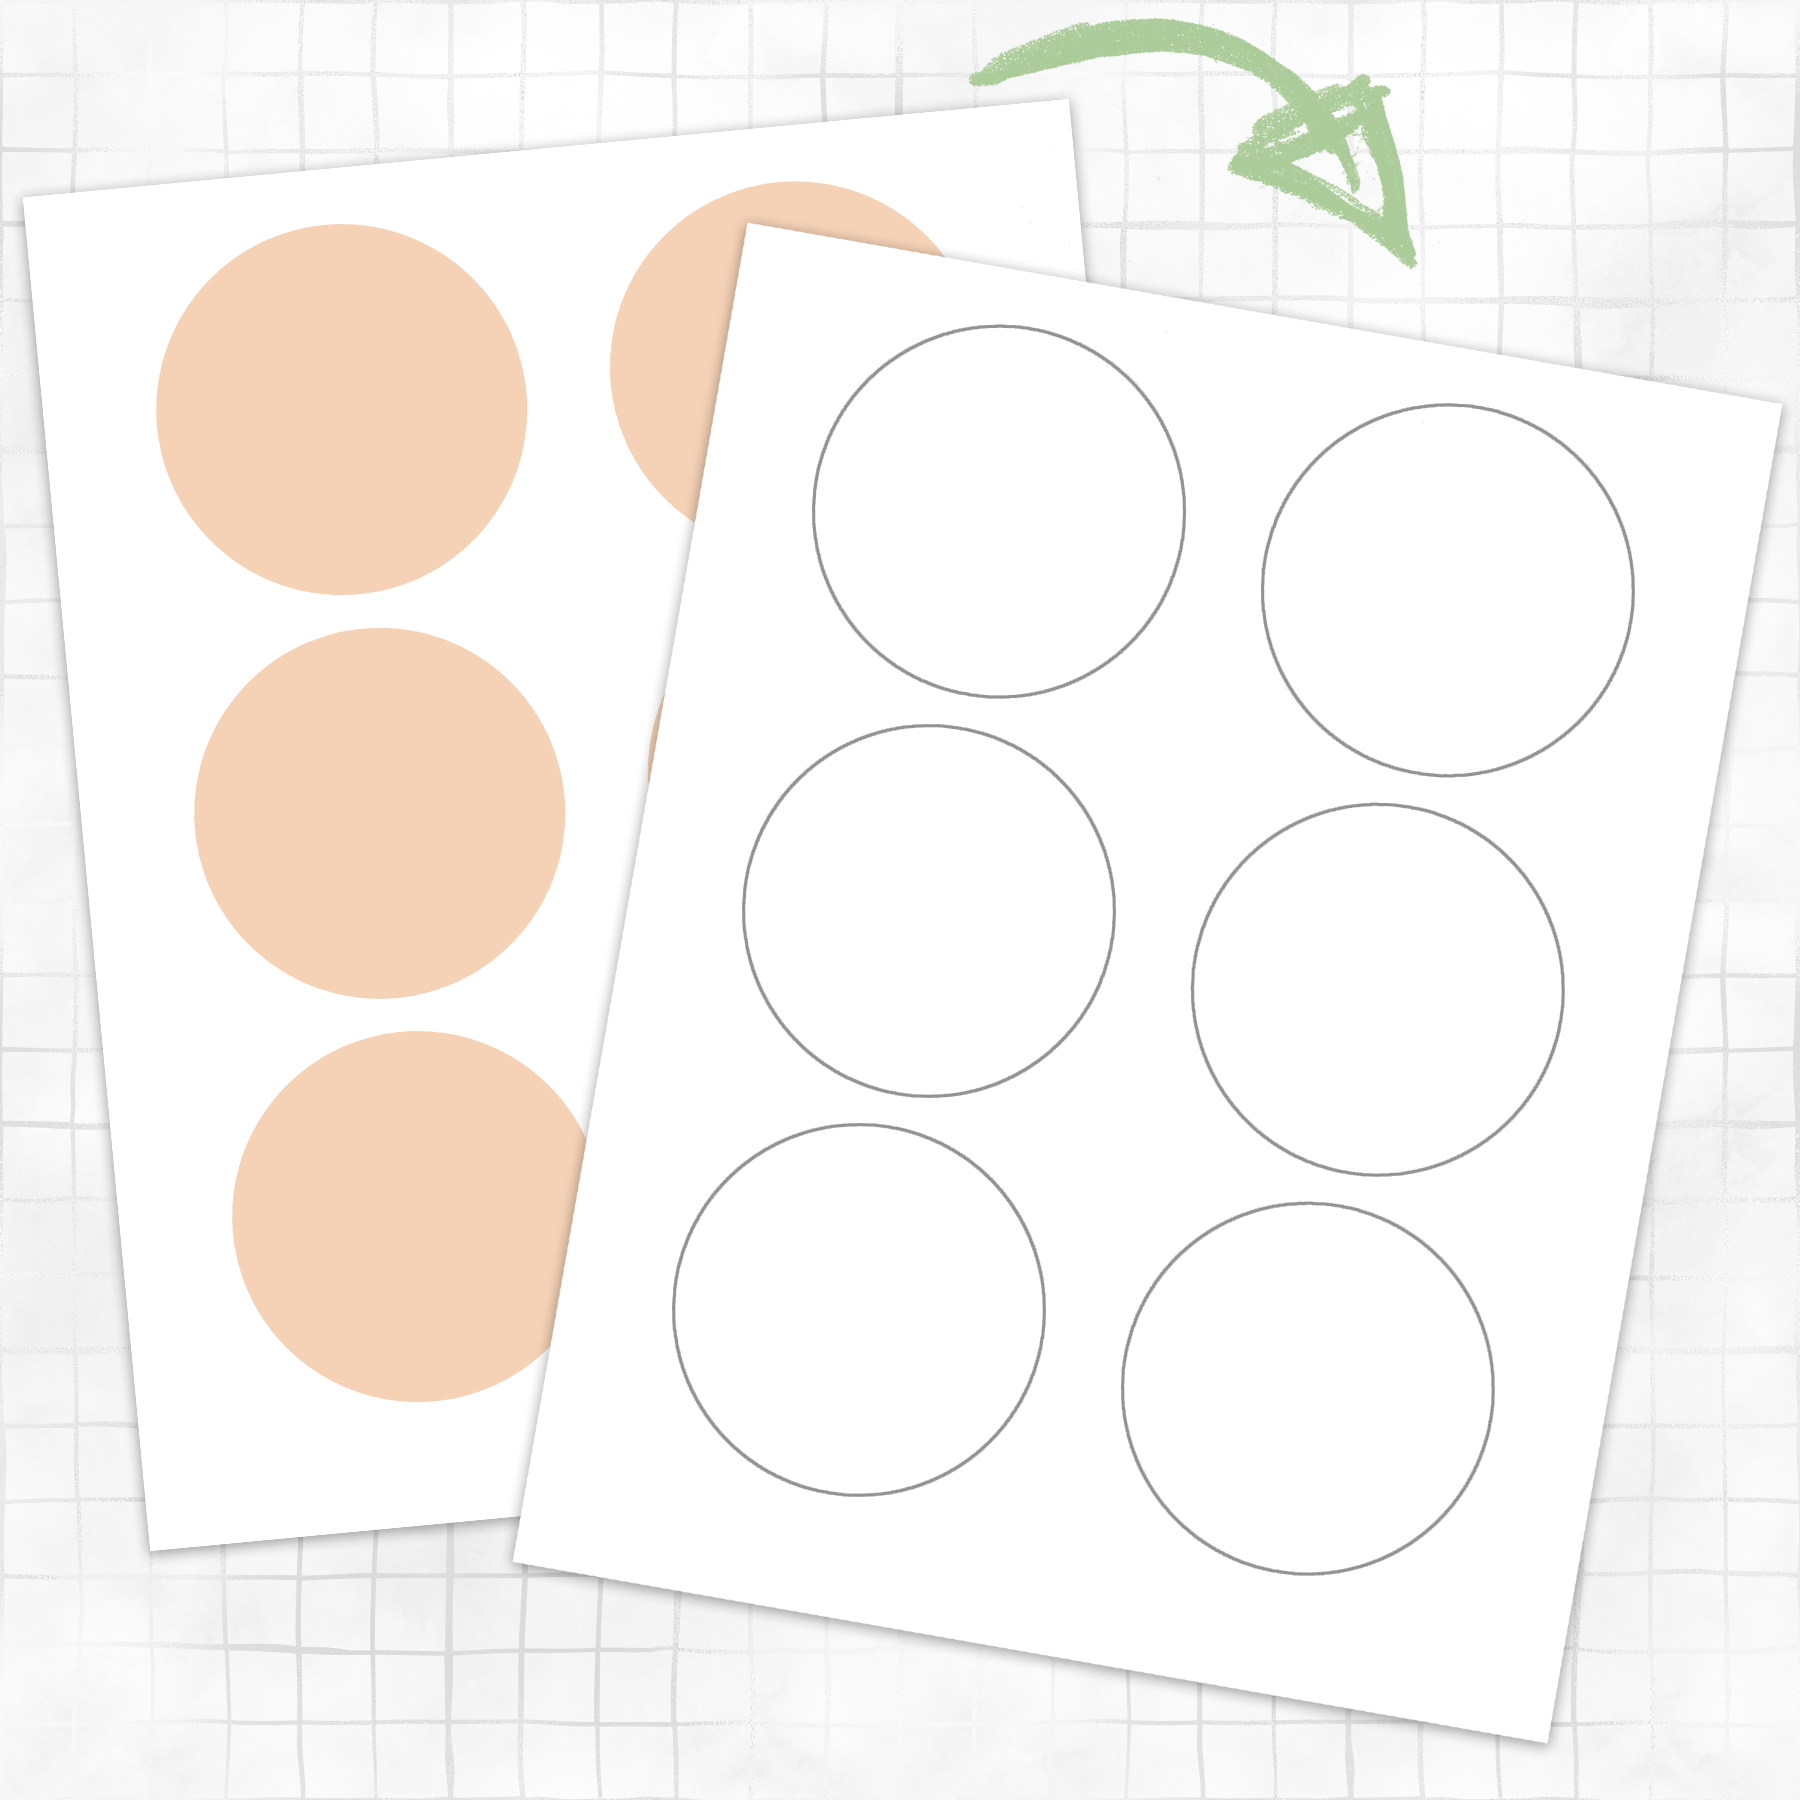
I'm often asked why my template shapes are not white...
Well, white on white is a problem, like a polar bear in a snowstorm. Adding an outline to define the shapes would be required but if I were to add that for you, I would be creating bigger problems for everyone else who doesn't want/need an outline.
Because these are templates and are meant to be edited, it shouldn't matter what color they are delivered to you as, since everyone will need/want something different, editing is all part of the process with a template.
So for projects where you require the shape color to be white you simply change the shape color and add an outline to define it on the page - if you need it that way for printing purposes.
What about registration marks you might ask? Why aren't those included? Well, those have a place in certain types of printables, but they work well only for straight edges, they don't work on curves, complex shapes or collage sheets with multiple elements.
Unless you are using a cutting machine and save your work as a PNG file with a transparent background... you're going to need those outlines.
In this tutorial I'm going to show you how to change the shape color and add an outline for the white-on-white method using the PSD file format inside the free online editor Photopea. We'll be working on the assumption that you want to change an entire sheet of shapes like in my example template.
See my previous tutorial on just changing shape colors using an entirely different method for a one shape at time process.
Photopea is comparable to photoshop and is compatible with PSD file formats making it very quick and easy to edit any photoshop file - for free! The process here is nearly identical to that of Photoshop itself so these steps very easily transfer over to both Photoshop CS and PS Elements.
STEP 1:
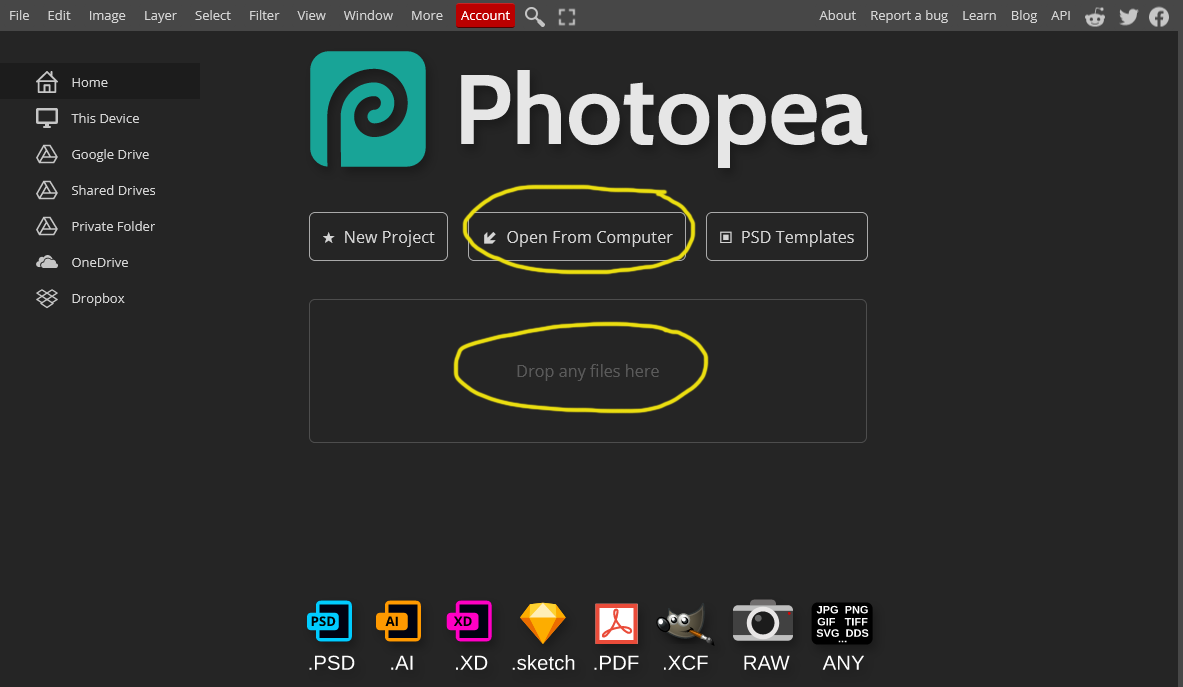
To get started, have your template ready, open your web browser and navigate to Photopea.
Either click "open from computer" to locate and load your PSD template file, or drag and drop the file onto the center of the screen.
This will open the file in Photopea and your screen will appear like in the example below.
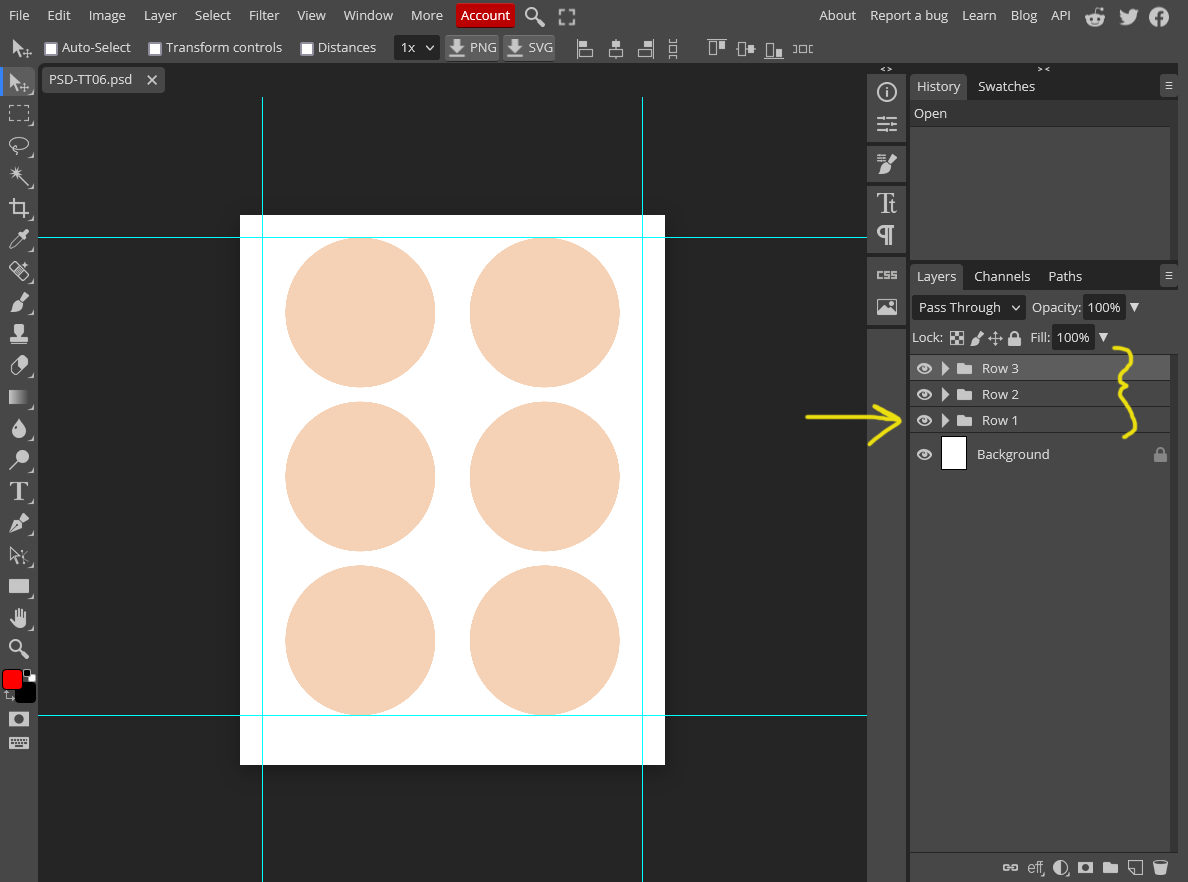
Make sure that you have selected the right file format by ensuring you have multiple layers in the lower right layers panel, as marked on the example below.
STEP 2:
Go to the layers panel in the lower right of your screen and open a folder by clicking on the little arrow next to the folder icon.
In this template example there are 6 circles, so there will be six separate shape layers, which are organized here by row into 3 folders.
Click once on a shape layer in the layers panel to select it and notice what happens on the canvas. A blue line will appear on that circle indicating it has been selected.
This is how you know which layer you are working with on the canvas. You can use Ctrl + click to choose more than one shape layer at a time which is something we will be doing further along.
STEP 3:
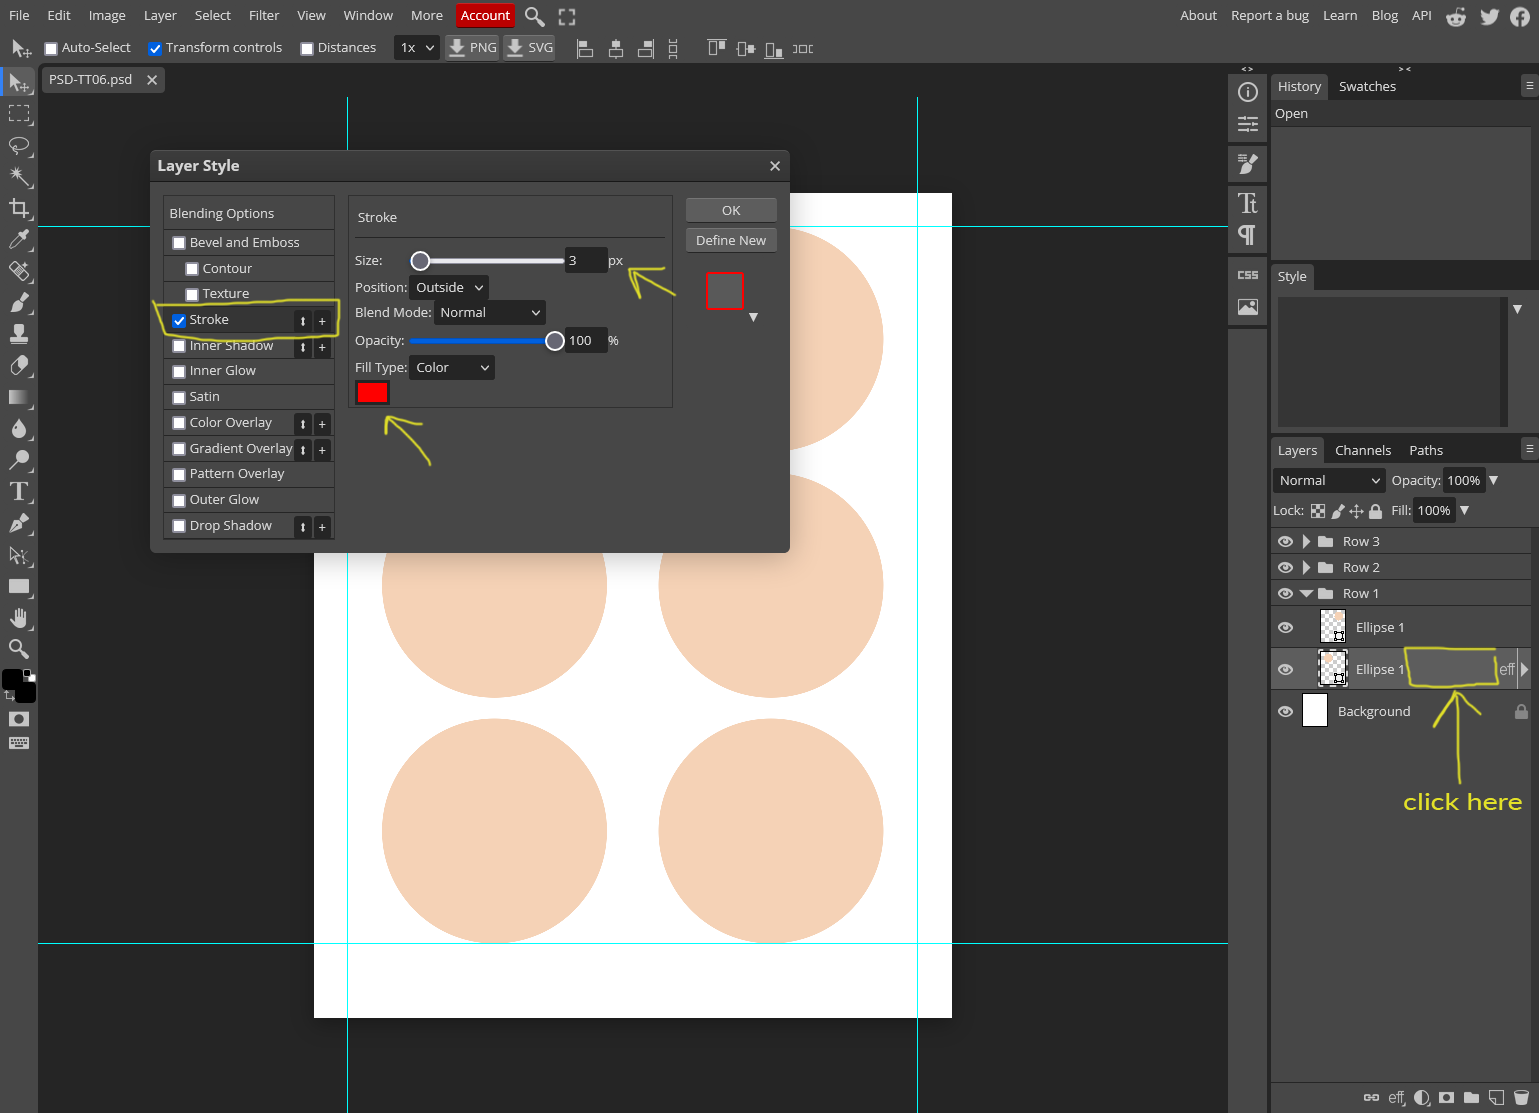
To add an outline and change the shape color we're to going to use a shortcut method to pull up the 'Layer Style' box. Double click on the shape layer in the layer panel box in the empty space next to the layer name as indicated in the picture.
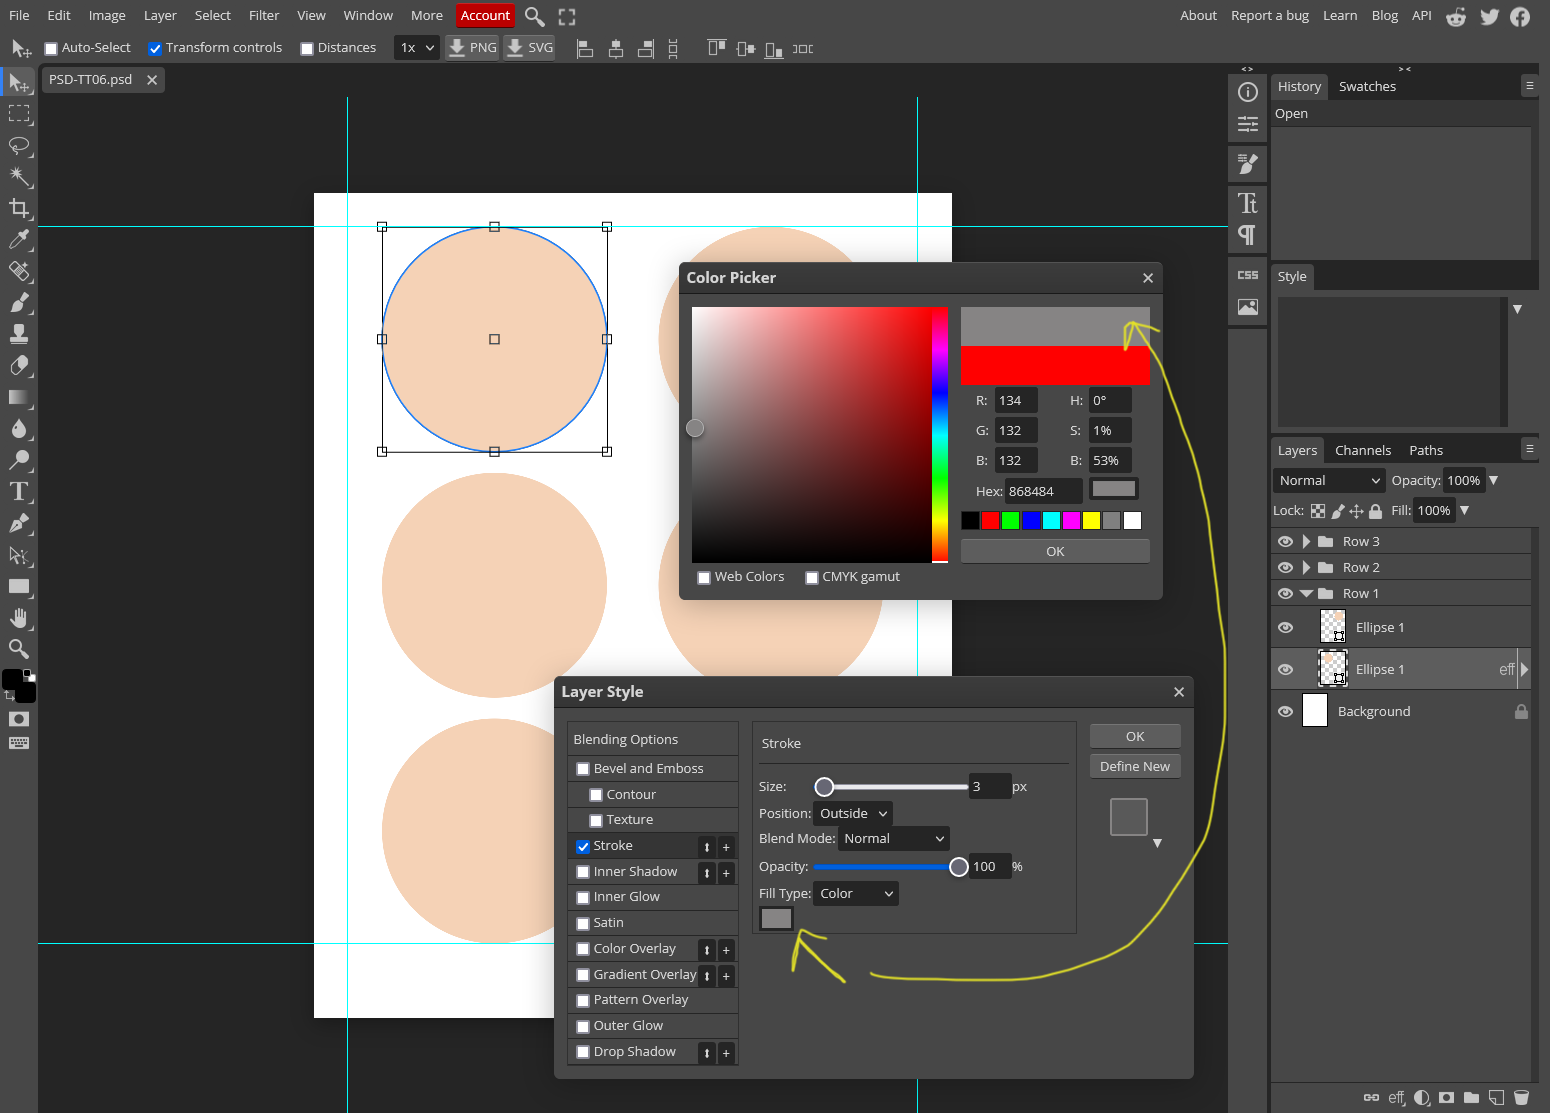
The Layer Style box should now appear on your canvas. There are many style options to choose from here but we're looking for the Stroke and Color Overlay options.
Starting with the stroke, select it by clicking on the name (and not just the tick box). This will bring up the stroke style options where you can adjust things like color and stroke size.
Leave the other settings as the default, as pictured.
STEP 4:
TIP: The menu boxes float, so you are able to drag them around your screen if you need to adjust your view of things. Just click and drag the top bar of the menu box to move it.
I'm going to use a light grey for my stroke. So I've clicked in the little color box (see picture) which opens the color picker menu. I can choose any color I want from here. I don't need to be too specific for this though so I'm picking a random light grey. I can always go back and adjust it if I need to.
Click OK in the color picker menu box.
For size, I'm going with the default 3px. Depending on your needs though you can go as big or as small as you want.
Keep the Layer Style box open while we go on to step 5.
STEP 5:
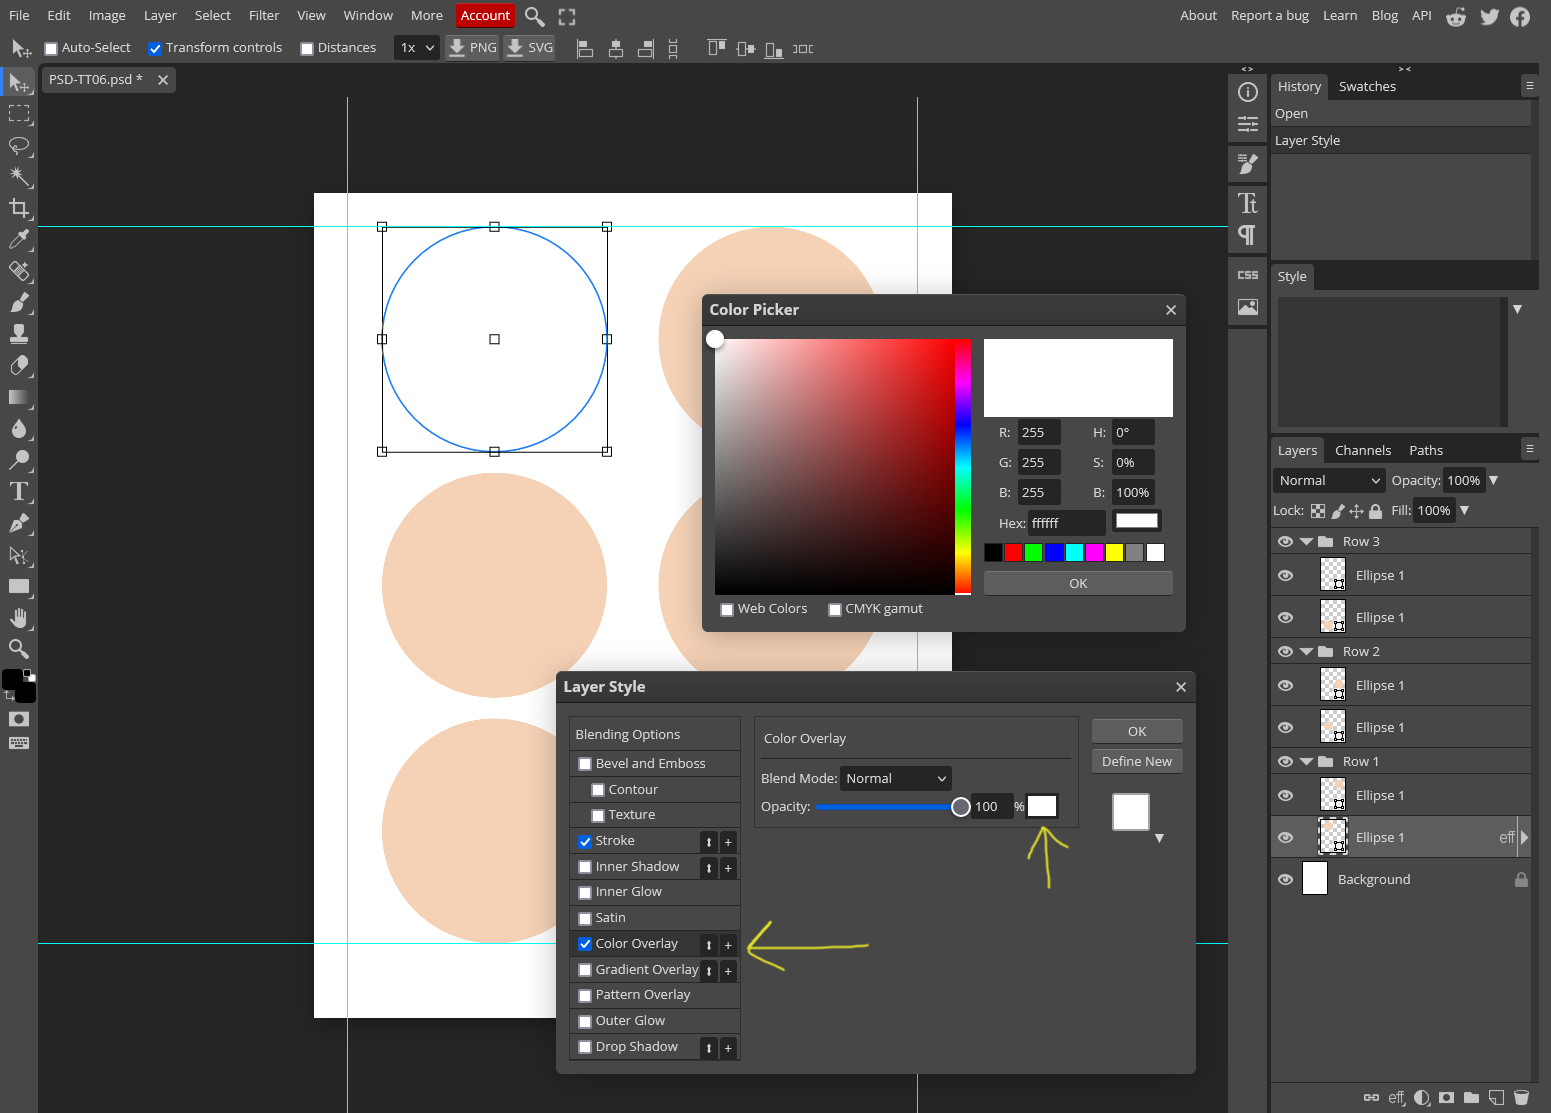
Let's change the shape color by using the color overlay option. Click this line the same way you did with the Stroke option and you'll get the color overlay menu choices. (as pictured)
We're going to select white in the color picker using the same process as we did for the stroke. Select white and click OK.
We're all finished with our style choices so you can click OK in the Layer Style box as well. The changes will now be applied to that shape.
Deselect the layer to see it fully just by clicking the background layer in the layers panel. You should now see a white shape with a grey outline.
Let's go apply that same effect to all the other shapes on the page!
STEP 6:
While you can spend the time to edit each shape individually, if you have many shapes that you want to apply the same layer style options to there is a quicker method.
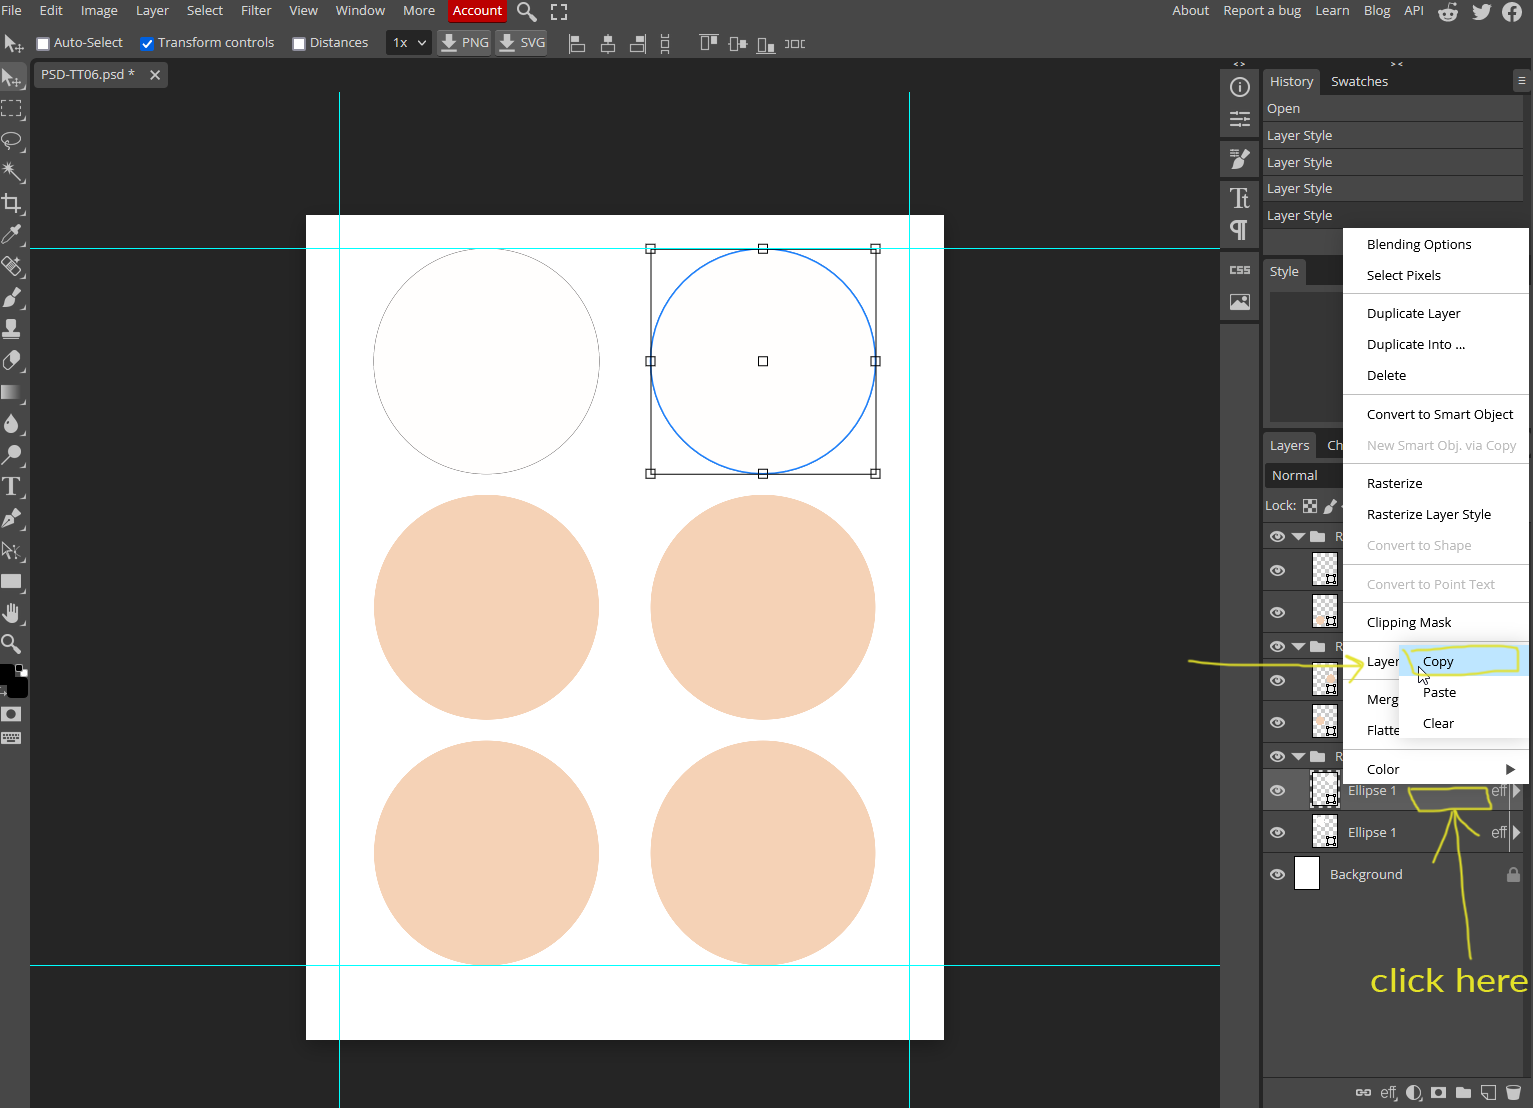
On the shape layer that we have already edited go to the layers panel and as before, in that empty space next to the shape layer name, this time you'll do a right click instead of a double click. You'll see a whole new menu list.
From 'Layer Style' in this list, open the sub menu and click 'copy'.
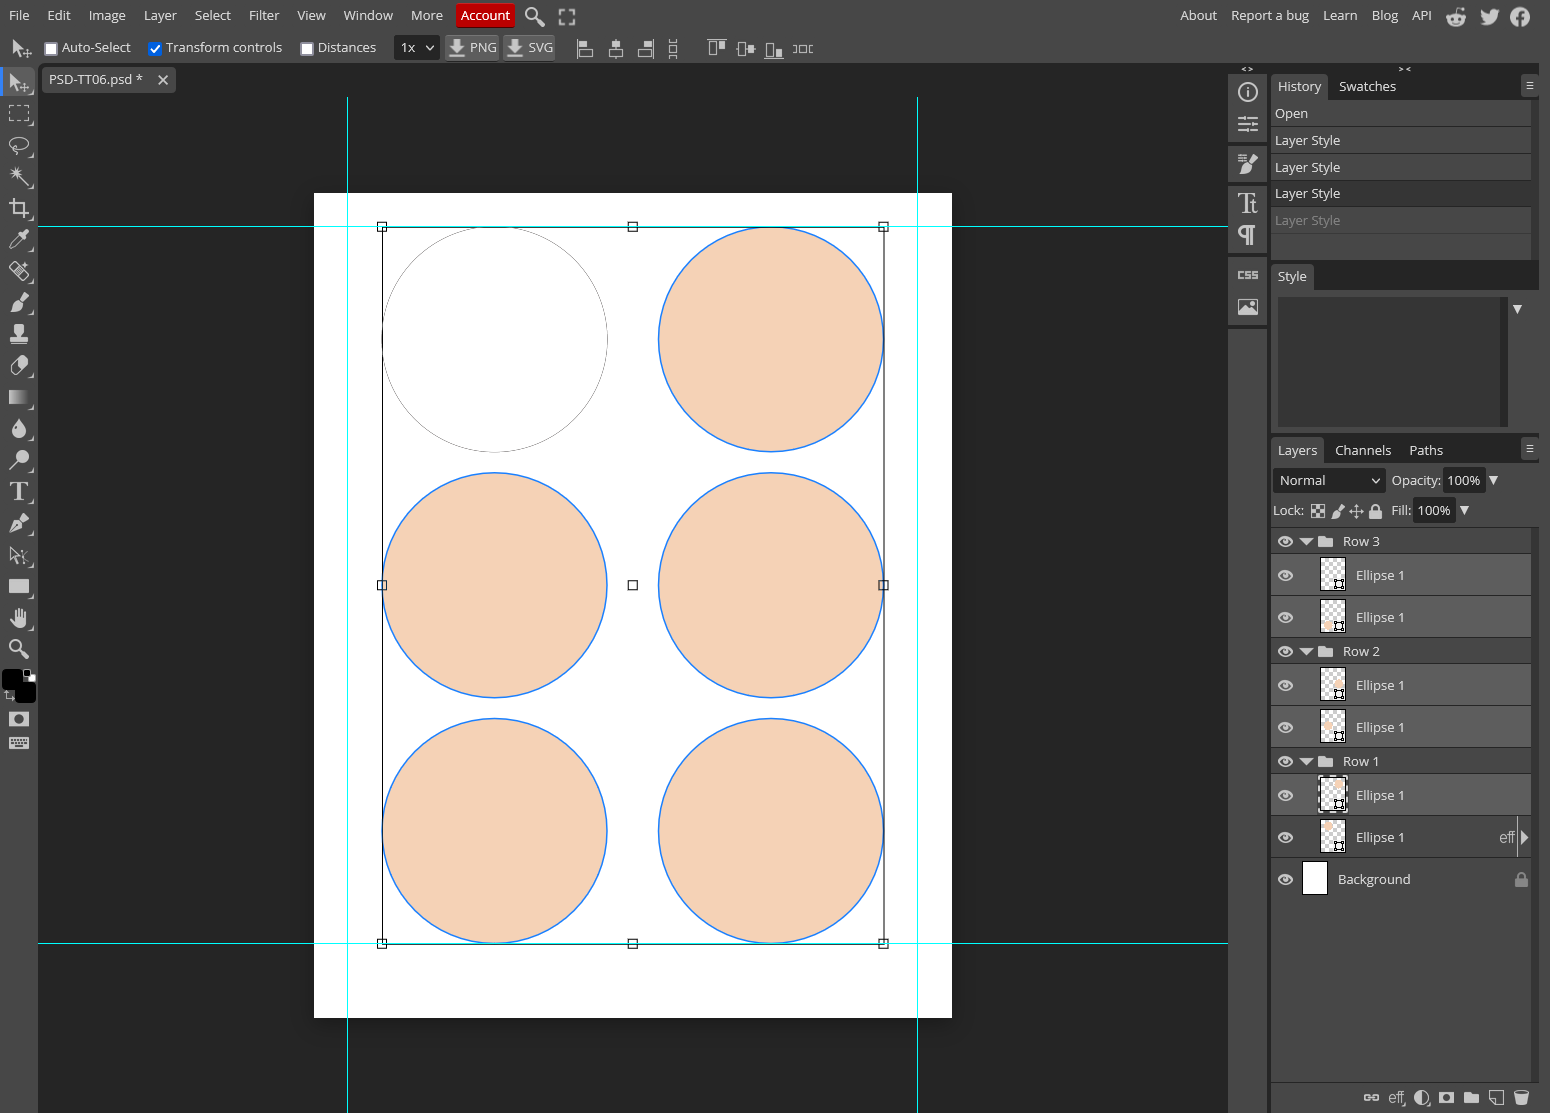
Next, you'll need to select each layer in the layers panel that you want to apply the stroke to. Use Ctrl + Click to choose all the other shape layers.
See image below for what that looks like.
STEP 7:
What we need to do now is paste the layer style on to all the other shape layers.
As before, right click in the layers panel on any of the selected layers. From the pop up menu go back to the Layer Styles sub menu and click 'paste'.
The changes should be applied instantly to all the shapes. If not, it's likely you selected something that isn't a shape layer. Perhaps a folder layer. Adjust your selections and try again.
If the template has a lot of layers I suggest doing this in smaller batches.
For an even quicker shortcut though, you can apply layer styles to an entire folder of shapes by following all these instructions but by clicking the folder line in the layers panel instead of the shape layer.
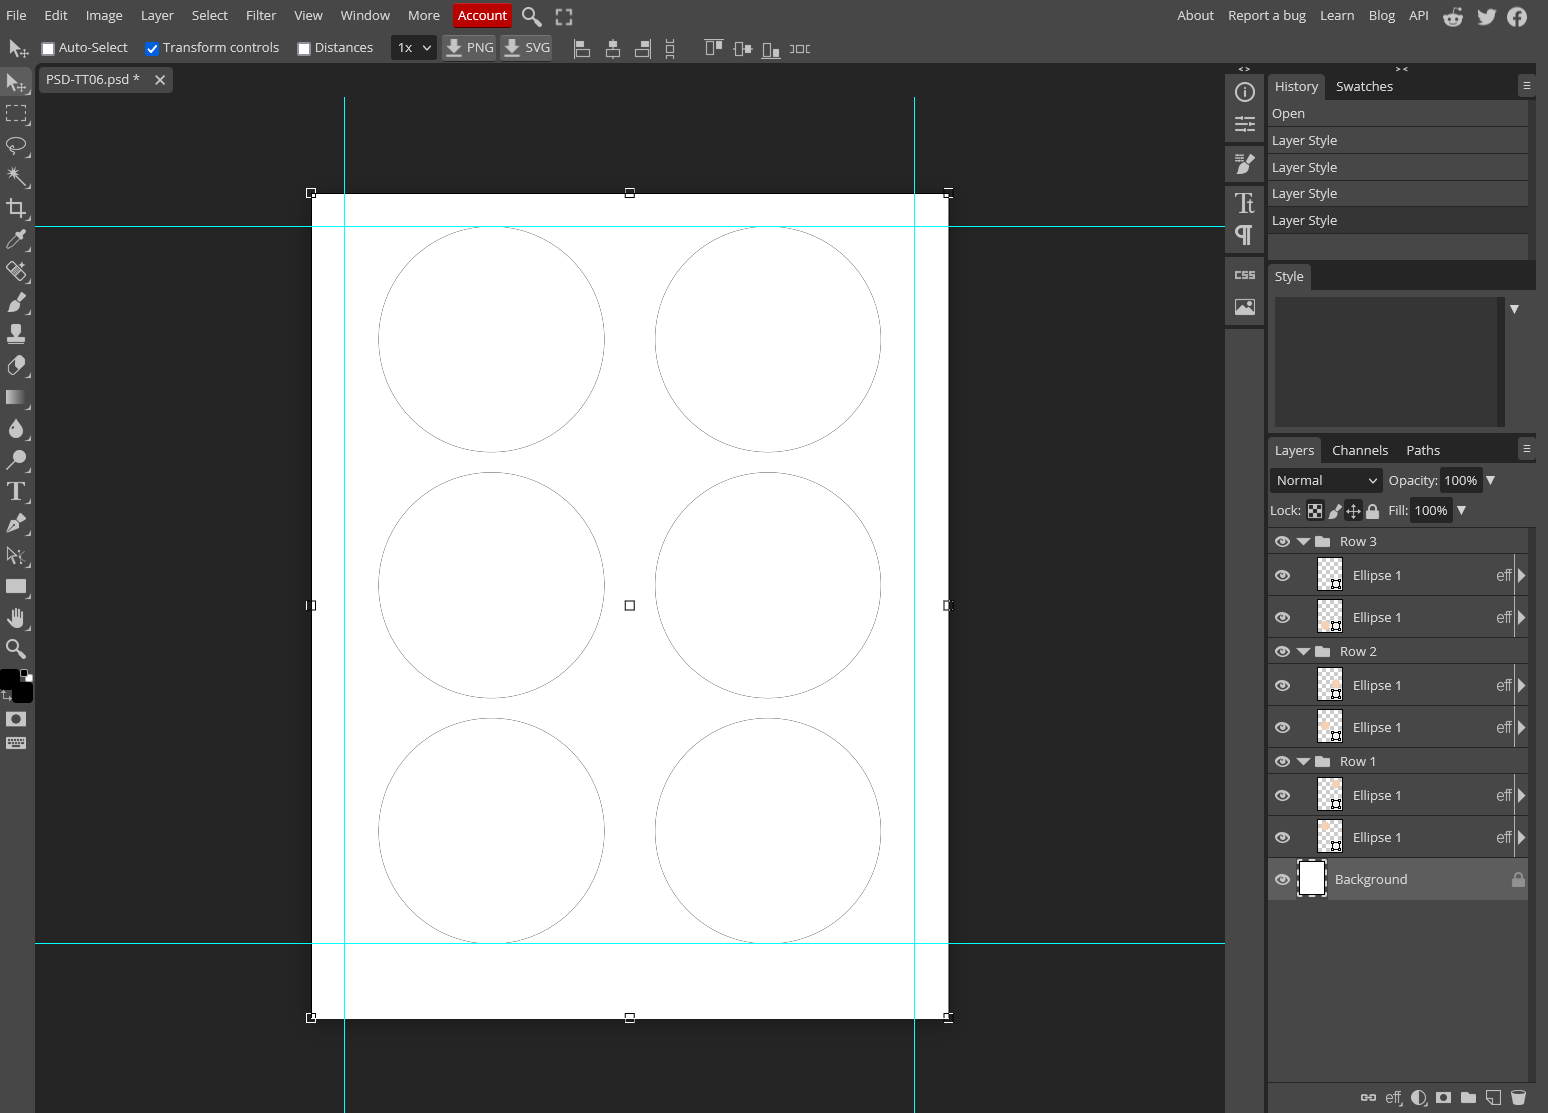
That's it. Have fun experimenting with the layer styles!
You're now ready to move on to whatever next steps are required for your project. Whether that's printing as is or adding other elements.
To save your newly edited template go to the top menu bar and in the top left corner click File>Save as PSD or File>Export As and choose whichever file format you need.
For PNG with a transparent background you'll need to turn off the background layer in the layers panel (just click the eye icon).
SVG is not compatible with the type of edits we've made here today, so while it will save, it won't work properly as a true SVG.
JPG or PDF will likely be the most suitable options.